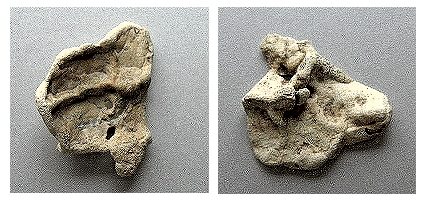
The other day I was hunting in an old camp and as I worked its edge I got a nice signal. The depth of the signal was 6 to 7 inches - the same depth that I had found all the other relics of the camp. After digging it up, I found a small piece of lead that was roughly 0.6 by 0.6 inches. I placed it in a plastic specimen bag, I marked the bag "ML1" which in my code meant "Melted Lead First Find of the day". Nothing much to worry about till I got home and started to clean my finds.
Small piece of lead (0.6 by 0.6 inches) believed to be the impressions of teeth from a Civil War campsite. The distinct ridge seen in the picture at the right attracted my attention.
As I cleaned the piece, two things caught my attention. On one side of the piece there was a distinct ridge running its middle (seen in the left picture above) and the second thing was the edge of the piece was slightly turned up. To me, this looked like the impression of something. The more I examined the piece the more I became convinced that this was not just a piece of melted lead but the impression of a human tooth or teeth against the lead.
Those who know me know that there is no limit to the way I will "CSI" a Civil War campsite. I decided to mold these fragments with clay and compare them to pictures of human teeth to test my theory.
In Exploring Civil War Campsites, Wayne Rex and I recommended using ordinary modeling clay for making imprints of relics. One problem with modeling clay is that it's not permanent. As Shakespeare once wrote “I have found coin of better metal.” - Sculpey Clay. Sculpey Clay is available at most crafts stores. It has the unusual property of initially working like modeling clay and after molding it can be turned into a hard Plaster-of-Paris like-casting by heating in an oven for a few minutes.
My Castings
I had to make a couple sets of casts in order to get what I wanted for photography. For one thing, I found that if I used my fingertips to shape the clay before casting my prints were left in the clay. Also old clay seams don't come out on the initial roll out of the clay as easily as modeling clay. This leaves false impression in the clay. So I recommend pushing the clay into a flat smooth surface to make it smooth . The results of my efforts are shown below.
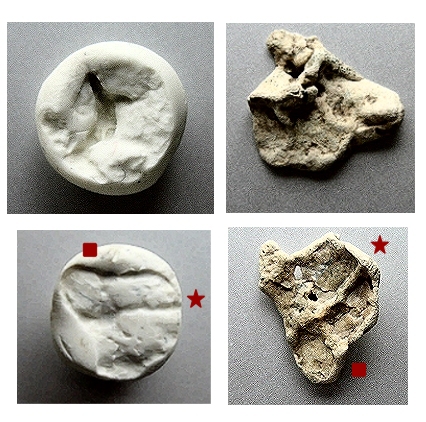
Casts made with Sculpey Clay (left) of top and bottom of a lead fragment (right) found at a Civil War campsite. The casts were compared with pictures of human teeth. Red star indicates termination of crevice in crown of tooth and ridge of lead that is slightly turned up in the lead and down in the casting. Red square is location of another crevice. Note these two ridges in the fragment crevices cross each other.
My Human Tooth Study
Most people don't like to think or even talk about teeth because of their painful reminders of dentistry. I began my tooth study by researching teeth pictures on the Internet. I finally found the pictures I needed to make the comparison with my casts. The composite picture below shows the position and normal fit of the teeth in a plastic skull and jaw. I selected the molar portion because they are the only teeth that are relatively flat and these would be the teeth that would normally chew on a piece of lead.
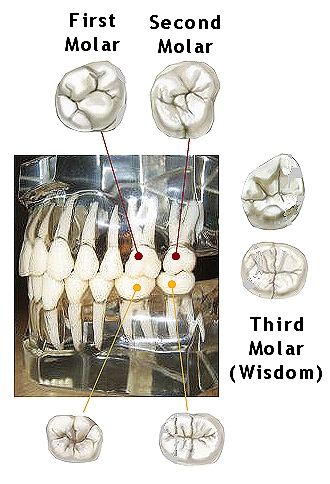
Composite picture of a clear plastic skull and jaw showing the position and fit of human molars. Not shown are the third set of molars are often referred to as "Wisdom Teeth" that usually appear between ages 17 to 25. Note the slight offset of the upper-lower fit of the first and second moltars.
The first thing I noticed was that each of the molars (upper and lower) have a different pattern to their crowns. Figuring which teeth made the impressions on my lead fragment would be a matter of matching the casting impressions to the pictures in the above picture.
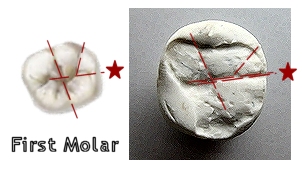
Comparing my casting impressions, I believe the imprints came from the first or second molar. I believe the closest match between the the casting and the lead fragment is with the first molar. The offset in the upper and lower first molar (see picture above) could also explain the squeezed-turn up of the edge of the fragment (red star). A case could also be made for the second molar.
Pretty neat to find a piece of lead that was crushed in some soldier's mouth during the Civil War. This fragment was a true "chew".
Non-Human Teeth
Typical camp finds of bullets and round balls are gnawed rather than chewed. The possible culprits include rabbits, groundhogs, nutria, squirrels, rats, goats and sheep and even horses and cattle. Chasing down via the Internet tooth pictures of these culprits met with limited success. I did find out that rabbits, squirrels, groundhogs, and nutria and other rodents have two large chiseling teeth on top which will make distinct marks on lead.
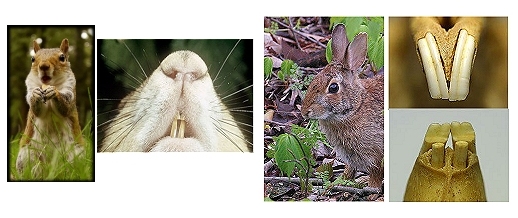
Examples of the two chiseling teeth seen on rodents and rabbits. Larger animals have more complex teeth.
With my new found knowledge of teeth I went back into my
collection and found a rodent-gnawed .69 bullet. Teeth of rodents are
usually singular with no grooves. Rabbits are not rodents
and have a groove down the middle
of the tooth (see picture above).
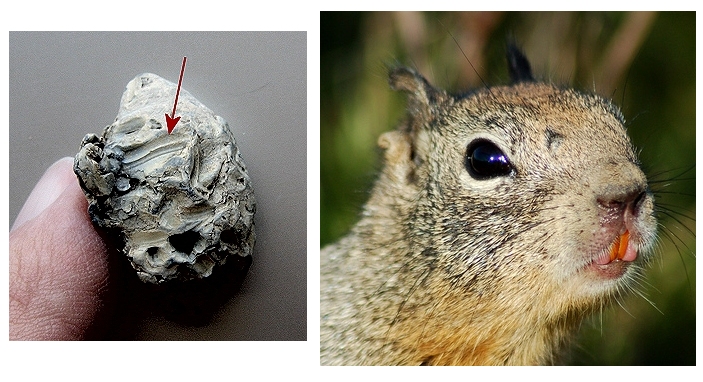
Tooth impressions in gnawed .69 bullet showing simple impression of two frontal rodent teeth (mostly likely a squirrel). Gray squirrel showing teeth.
Like what you read? You can find more techniques like this in my books and CDs. DP
University of Michigan Museum of Zoology Animal Diversity Web at: http://animaldiversity.ummz.umich.edu/site/topics/mammal_anatomy/tooth_diversity.html
Civil War
Tooth Impressions
molar imprints
chew
tooth casts