
We estimated the caliber of spherical projectile fragments using a homemade radius of curvature device in an article entitled, “The Plunger”. This has been recently revised in a new presentation entitled, “The Artillery Plunger-Revisited”. Solid spherical projectiles, cannon balls, grape and canister measurements are covered in an article entitled “Cannon Balls, Grape or Canister; A Guide to Authentic and Non-Authentic”
This article explores methods of estimation of the diameter of rifled projectile fragments. For battlefield and skirmish exploration, projectile diameter is important in indentifying the type of projectile and the nature of the artillery used at the engagement. Sometimes it can even point to which side fired the artillery and its location.
The method described below is best applied rifled projectiles. Solid rifled projectiles like bolts are best measured directly with a ruler, caliper, or diameter tape.
Two rifled fragments from the same Virginia battlefield. What projectiles do these fragments represent and what type of artillery could have fired them?
An Example: Those familiar with artillery fragments should immediately identity a Confederate Read shell fragment (upper fragment) in the figure above because of the bourrelet and a slight ogive on the right side of the fragment indicating that the bourrelet is from the fuse end of the shell. The bourrelet is the portion of an elongated artillery projectile having a very slightly smaller diameter than the interior diameter of the barrel through which that projectile is to be propelled. Since only the bourrelet and the sabot portions of the shell (which we do not have) are in contact with the cannon bore. Estimates of the diameter of the projectile from this fragment must be made from the curvature of the bourrelet.
The lower fragment is also interesting. It also has an ogive on the right side and careful observation of the upper portion of the fragment indicates the presence of a flame groove. This should point to a Hotchkiss case-shot projectile. Any estimate of the caliber of this projectile would have to make use of its non-ogive end of the fragment.
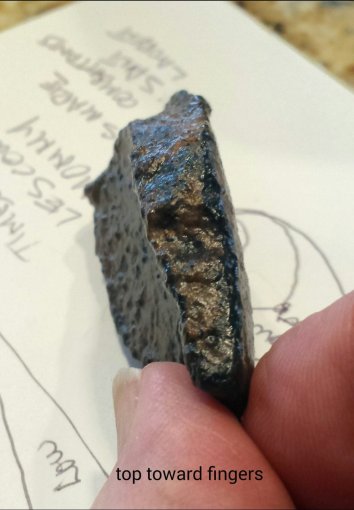
Detail of second fragment showing thickness tapering and ogive end of the fragment. Fuse end of shell (ogive end) is toward fingers.
Two methods appear to be possible for estimating the diameter of rifled projectile fragments; the template method and the android smart phone application method called “On Diameter”. Unfortunately to the author’s knowledge, there does not appear to be an equivalent application on the IPhone. The “On Diameter” application is available through the Google Play Store.
Trial diameters/calibers can be readily found at Jack Melton’s Civil War Artillery website or other artillery publications listed below.
Method One: Template Method
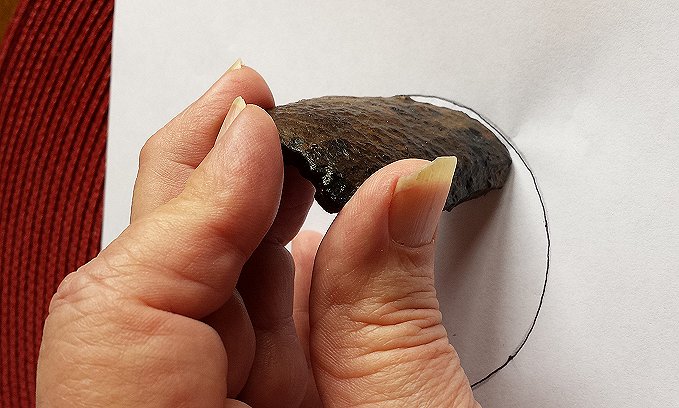
The template method is perhaps the simplest method of diameter/caliber estimation from fragments. With a drawing compass, set to the trial radius of the shell.
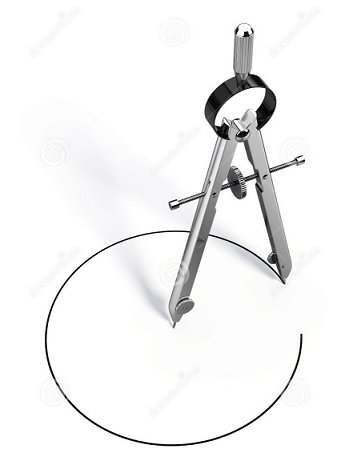
Drawing reference circle with drawing compass with trial diameter equal to the diameter of fragment. Below: matching of curvature of drawn circle with diameter to caliber of projectile fragment.
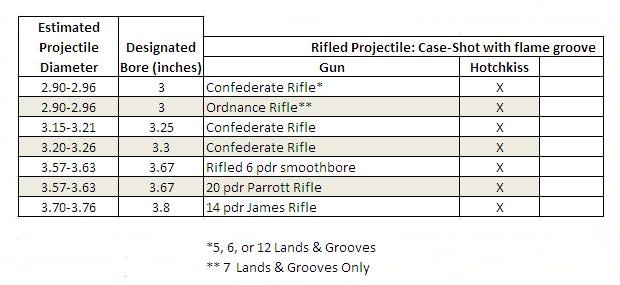
In the case of the Hotchkiss case-shot fragment with flame groove, there are potentially seven solutions to the caliber of the projectile. The possible diameter matches are shown in the table below. Only case-shot Hotchkiss shells have flame grooves but they can be fired from a number of guns with differing bore sizes.
The major disadvantage to Method One is that it requires several reference templates to be made and kept for various shell diameters.
Below is an Excel table showing a range of estimated projectile diameters for case-shots with flame grooves. The projectile diameter range for various guns was calculated by taking the barrel bore in inches and subtracting 0.1 for the high end to 0.4 for the low end. Thus the Federal 3-inch ordnance rifle with a barrel bore of 3 inches would have projectiles diameters in the range 2.90 to 2.96 inches using the above calculation. This projectile “windage” estimate was suggested by Civil War artillery expert Peter George.
Also shown are guns and gun bores and shell types typically fired from those guns. All are Hotchkiss projectiles of various calibers. The table was also applied using Method Two.
Method Two: Android Smart Phone Application:
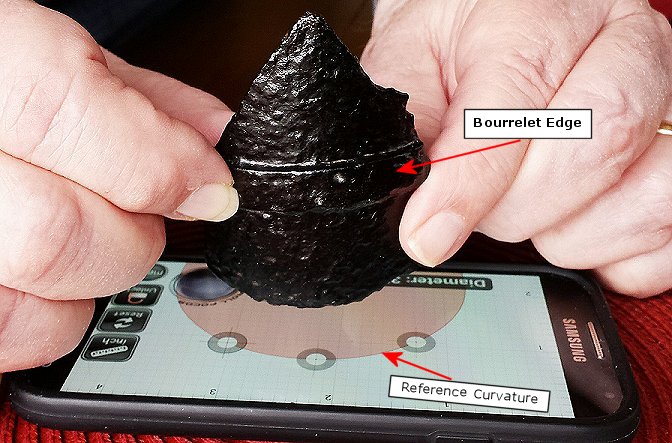
Author sighting down the axis of the fragment and matching bourrelet curvature to the curvature of “On Diameter” android application for his cell phone. It can be used to estimate the projectile diameter. A curvature match was made with the diameter of the Reference Circle display set to 2.94 inches. The match indicates that the projectile was fired from either a 3-inch Confederate rifle or a 3-inch Federal Ordnance rifle. For best accuracy, the sighting eye, and fragment curvature must be vertically aligned to the Reference Circle on the phone display.
[Below] The Reference Curve is setup on the phone application by moving the reference circle points to the desired diameter is shown in the lower left corner of the display. Fine changes in the diameter can be obtained by moving the “Scroll Focus” button. The reference curve can be made well beyond any size projectile fragments.
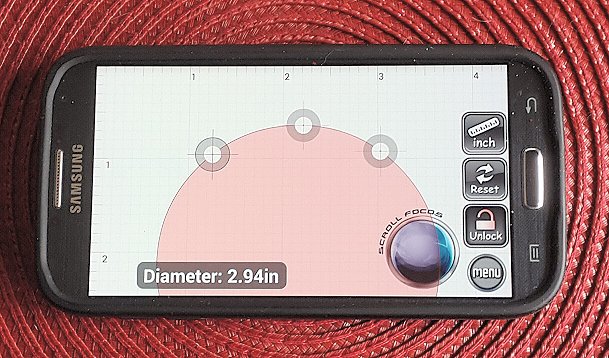
Matching the Reference Circle to the diameter of the projectile fragment can be difficult as a “match” may not coincide with known fragment diameters. This is true as one approaches the correct fragment diameter and the differences are small.
Here are some suggestions on improving the accuracy of your diameter estimate.
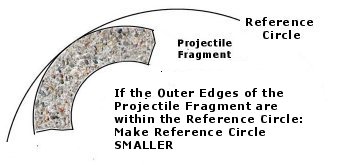
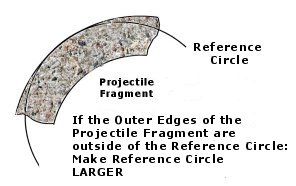
1. 1. Try to change the diameter of the Reference Circle in 1” increments till you have a reasonable match to the projectile fragment. Match the outside edges of the Projectile Fragment to the edges of the Reference Circle.
2. 2. If the outside edges of the projectile fragment are inside the Reference Circle: Make the diameter of the Reference Circle LARGER.
3. 3. If the outside edges of the projectile fragment are outside the Reference Circle: Make the diameter of the Reference Circle SMALLER.
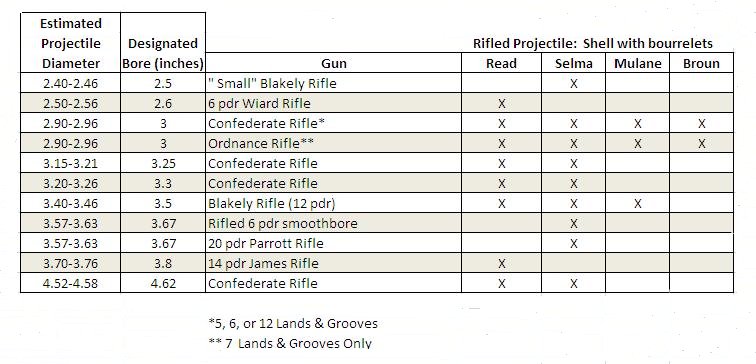
The table below shows the range of diameters (projectiles with bourrelets), matching rifle types and bores along what shell types were fired from those weapons. Our estimated shell diameter for the bourreleted fragment was 2.94 inches which is in the middle of the diameter range for the Confederate or Federal 3-inch guns. This means that the fragment could be from a Read, Selma, Mulane or Broun shell. Broun shells have a wider bourrelet that the fragment we are investigating and Selma shells are typically found in the deep South. This leaves the Read or Mulane shells that are commonly found in Virginia.
A similar table shown above for case-shot fragments with flame grooves was applied to Method Two and the best match of the Hotchkiss case-shot with a flame groove was also 2.94 inches. This suggests that the case-shot could have been fired from either a 3-inch Confederate Rifle or Federal Ordnance Rifle.
Identification tables for other projectile characteristics will need to be prepared by the user. The diameter of projectiles of interest can be found in the references listed below. In general, windage range on fired projectiles is 0.10 to 0.04 inches less than the bore caliber.
Some Caveats:
The average accuracy of the android application is + or – 1.5%.
Accuracy depends on how well:
- - The user calibrates the reference object (usually the phone’s screen size) in the “On-Diameter” application.
-
- The curvature of the
projectile fragment is matched to the reference curvature in the case of the
fragment laying directly on the phone’s screen.
- The user aligns the
smaller reference circles with the fragment’s edges.
- - In the case where the fragment is held above the phone’s screen, sighting eye, fragment edge, and reference curve must be in vertical alignment.
Author Note: The above article is based upon discussions with Civil War artillery expert Peter George. I am indebted to him for these discussions and the sharing of his knowledge.
Tip from Peter George on measuring bore on cannon muzzles: Pete suggests using a dollar bill and folding it to diameter of bore. Be sure to mark which folded side is the correct measurement.
Another Way to Make the Diameter Calculations:
Recently, the author stumbled across a radius from an arc calculator on the Internet. It can be used for both rifled and spherical cannon fragments. It can be found at:
http://www.handymath.com/cgi-bin/arc18.cgi?submit=Entry
The calculator allows for the radius of the fragment derived from its curvature. Shown below is the calculator.

To solve for the radius of a fragment, the length and width of the arc is measured and input into the calculator. The radius is then doubled to find the diameter of the fragment. Note that the input units have been changed to centimeters (cm) and the calculated radius units are in inches (in)
An Example Calculation
Using a 12 pdr. shell fragment, the following measurement s were made with a millimeter tape and an electronic caliper. Measurements were made in the same location on the shell.
The arc length was 9.5 cm. and the arc width at the same location was 8.5 cm.
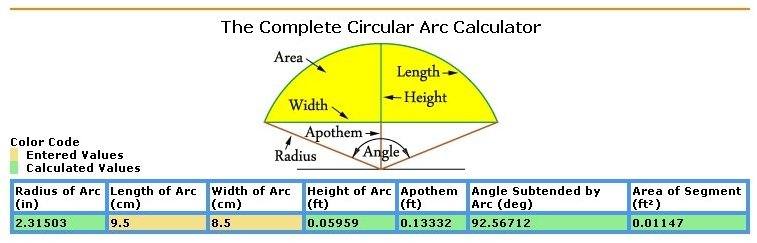
The calculated value for the radius of the fragment from these two measurements was 2.31503 inches and when doubled the diameter was 4.63 inches this compares favorably to the actual diameter of the 12 pdr, Confederate polygonal shell of 4.62 inches (which it is). The calculator works for both spherical and elongate projectiles. For elongate projectiles, be sure to measure perpendicular to the long axis of the projectile. Do NOT measure the tapered portion of an elongate projectile with the above method.
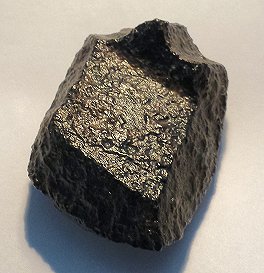
Confederate Polygonal shell from which above measurements were made.
Good Additional Readings:
Dean S. Thomas, “Cannons: An Introduction to Civil War Artillery”; 1985; (ISBN 9780939631032); 72 pp.
United States Army Ordnance Depot, “The Ordnance Manual for the Use of Officers of the United States Army”; 1862 & reprinted 2006; University of Michigan Library Reprint; (ISBN 9781425559717); 540 pp. Also available through Google Books.
Dickey, Thomas S. & George, Peter C., “Field Artillery Projectiles of the American Civil War”; 1993; Arsenal Publications; (ISBN 0960902201); 552 pp.
US War Department, W.H. French; W. F. Berry and H.J. Hunt “Instruction for Field Artillery”; 1863, 281 pp. Also available through Google Books.
John Gibbon, “The Artillerist’s Manual”; 1860; (ISBN 1402114230); 568 pp. Also available through Google Books.
Warren Ripley, “Artillery and Ammunition of the Civil War”, 1970, Promontory Press; (ISBN 0-88394-003-5): 384 pp.
Jack W. Melton & Lawrence E. Pawl, “Guide to Civil War Artillery Projectiles”; 1996;Kennesaw Mountain Press; (ISBN 0-9635861-1-4); 96 pp.
John C. Hazlett, Edwin Olmstead, & M. Hume Parks, “Field Artillery Weapons of the Civil War”; Revised Edition; 1988; University of Chicago Press; (ISBN 0-252-07210-3); 322 pp.