Three
telltale “remnants” or projections on the casting that can be used as
part of
the authentication process for medium and larger solid shot.
By
David Poche with Peter George
Terminology: Solid
Shot are spherical solid (not hollow) cast iron objects that are fired
from
Civil War cannons.
The Problem of Identification: Unless you have personal knowledge of an excavated solid shot from a Civil War location, the authenticity of the object is subject to interpretation. Typically, spherical cast-iron or steel balls are purchased at garage sales, auctions, antique shops, or on Ebay. Sometimes individuals state a provenance for the object like “my grand-pappy plowed this up on his farm”. Shot of this type can come in all sizes and are usually made of steel, cast-iron or brass. Civil War cannonballs were never made of steel or brass. Many non-authentic items at these events turn out to be large ball bearings, cement truck tank cleaning balls, roller mill balls, wrought iron ornamental fence balls, and even old high school Sports shot puts. Each of these items has a telltale set of characteristics that can point us away from being non-authentic.
Cast
Iron Versus Steel: Authentic cannon balls
and
smaller solid
shot (canister and grape) are made of cast-iron rather than steel. The Federal
Ordnance Manual of 1862 stated that all shot and shell were
to be
fabricated from cast-iron with only one exception (lead).
How are they cast?
The
casting of solid shot and shell is well covered in
Dean Thomas’ book Cannons.
Basically, two hemispherical
sand molds are prepared and are attached together. The mold-pair is
filled from
the side at the seam between the two mold halves until liquid cast iron
appears
in the mold’s vent at the top.
The
casting process creates three distinct telltale
identification points on cast solid shot that point to authenticity.
These
are:
(1)
The mold
seam created by liquid metal flowage into the tiny gap
between the two mold
halves;
(2)
The filler
hole sprue created at the mold seam from liquid metal
entering the mold;
(3) The mold
vent sprue created as the metal begins to fill the hole at
the top of the
mold. The vent sprue is always at a right angle to the plane of the
mold seam.
The
filler hole sprue is always located along the mold seam on
cannonballs and is usually represented on the finished product as a
small (0.25
to 0.50 inch) imperfection. If the cooling of the metal of the casting
caused
the metal in the vent to contract and create a depression in the
casting this
was sometimes patched with lead (rare).
Inherent
in this type of casting is the presence of air bubbles
being trapped inside the casting. This has the effect of
weight reduction of
the casting.
Three
telltale “remnants” or projections on the casting that can be used as
part of
the authentication process for medium and larger solid shot.
After
casting,
any metal surface projections on the solid shot were removed by hammer,
chisel,
and file. Special care was taken with cannonballs since any projections
would
be likely to come in contact with the cannon’s bore and would or could
damage
the bore due to metal-to-metal scraping. Poorly cast (cannonballs with
surface
projections) could also jam in the bore causing the barrel to burst on
firing.
This
is why
cannonballs were manufactured to be perfect spheres and never
out-of-round
(like an egg, potato, or onion).
At
the
smaller
end of the caliber spectrum of solid shot, surface projections are more
apparent. Canister might display some finishing. Also canister mold
seams,
casting and vent sprues will be more apparent than on larger caliber
solid
shot.
Much
less care
for removing casting remnants was taken for grape shot and canister
since these
projectiles have little contact with the cannon’s bore during firing.
Knowledge
of solid
shot casting will bear directly on the types and location of
measurements made
on solid shot for authentication.
Smaller
solid shot was Gang-cast, in which multiple canister or
grape shot were cast in a single mold. These shot would all have a mold
seam
line but would vary in the type of sprue projections present, depending
upon
the type of gang mold used. Some gang molds had interconnected flow
channels;
others did not. Thus the castings of canister and case shot frequently
have
some surface casting projections and are usually much “rougher”.
Smooth Surface of a 4.52 inch (actual diameter) 12 Pdr. caliber cannonball showing only a very faint trace of a mold seam.
Note the rough and irregular nature of the surface of these Gang-cast canister balls. They may or may not have been tumbled in a milling barrel to remove their casting projections as required by the Ordnance Manual. Expeditious shortcuts in manufacturing were often taken during the Civil War. Steel ball bearings (non-authentic) of this size will have no such casting projections. The gang-cast canister balls in the photo were excavated by the author Poche at Port Republic, Virginia.
There
is a
simple three-step method for determining the
authenticity of solid shot. This method plus a few caveats will
significantly
enhance your odds of purchasing authentic pieces.
Step One: Determine the
Diameter of the Ball
Three tools for measuring the diameter of solid shot: the diameter tape, the machinist’s feeler gage and the electronic caliper.
For
large cannonballs, place the ball so that the plane of the
mold seam (“equator”) is vertical and the “poles” are horizontal.
Measure with
a mechanist’s feeler gage or calipers slightly off the poles along the
opposite
red arrow lines shown in the figure below.
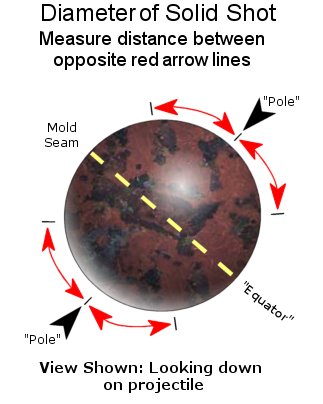
Measurement
locations
for the
diameter of “possible”
cannonballs. Measurement should be made with calipers or a machinist’s
feeler
gage in the plane of the “Pole” and using the opposite red arrow lines.
CAUTION: Avoid making measurements at the poles since casting
projections could
disrupt diameter measurements.
There
might be a casting projection at the pole location. Slide
the feeler gage or calipers up and down to make sure that the maximum
diameter
(thickest point) is being measured. Take the largest measurement and
lay
measure against ruler with 10ths of an inch or read the calipers
directly.
A
casting filler sprue (if any) would be located along the mold
seam and the vent sprue, if present, would always be located at the
“pole” (90
degrees away from the mold seam). These will surely be present on
smaller solid
shot (canister).
Another
method for measuring the diameter of larger solid shot
is to use a diameter tape (like Stanley model
33-115 -available from
most hardware stores). This tape is wrapped around the “equator” of the
ball
and its diameter can be directly read from the backside of the tape.
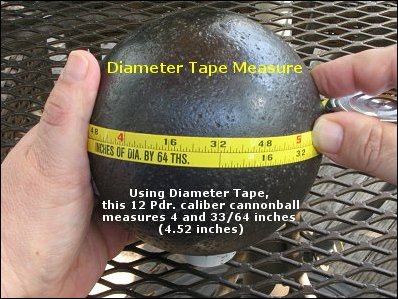
An
easy way to measure
the diameter
of cannonballs is to
use a diameter tape, which measures the diameter of the ball directly.
Surface Examination:
Any large
surface irregularities or pronounced out-of-roundness suggests that the
object
is non-authentic.
The
general surface of a cannonball should be smooth unless
heavily pitted by corrosion. There should be no wide belts or
raised bands
at the mold seam, but a faint trace of the mold seam (if any) as the
previous
picture of the 12 Pdr. shows. There should be no
flat spots, egg-shape
or out-of-roundness to the object.
If
surface projections or dimples are present, but not in their
correct places (pole and equator), then this points to the object as
being
non-authentic.
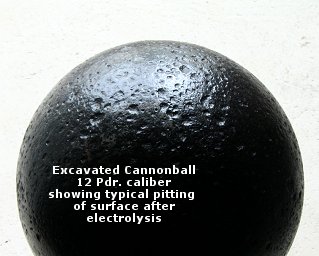
Surface pitting of excavated solid shot is to be expected due to the migration of elemental iron to a new location on the surface of the ball where rust scale (iron oxide) is formed. Excessive scale may influence diameter measurements.
Smaller
diameter solid shot (such as grape shot, and canister
shot) often tends to be more irregular than midrange-sized cannonballs.
Expect
fairly pronounced mold seams and clear evidence of the locations of
removed
filler and vent sprues. These former casting projections are located at
the
same points on the surface of the sphere as larger solid shot. Because
many of
these projectiles were gang cast, they will only have filler sprues
along the
mold seam. In
Gang-casting, a mold vent
was present only in the last projectile of the Gang-cast line.
Manufacturing
tolerances of grape shot and canister were not
nearly so precise as those of cannon balls since they were not intended
to come
into continuous contact with the cannon’s bore. Generally armories
and their subcontractors were allowed plus or minus 0.03 inches on the
diameter
of the smaller caliber solid shot they produced.
The
measured values of diameter will be compared with ranges
given in the Shot
Tables of the Ordnance Manual of 1862. Excavated
cannonball measured
values must fall within the range of the Tables to be considered
authentic.
Caveat: The
diameter of any solid
shot may be
altered by the effects of pitting or scaling of its surface, and
exposure to
acidic ground water. Both effects may make it lighter.
It
should be pointed out here that with only one exception, no
military solid shot was ever fabricated at a diameter equal to a ruler
fraction
(1/4,
�,
� or an
even 1).
Ruler-fractioned objects are all civilian rather than military and a
quick
glance back at the Shot Table diameters will confirm this. The single
exception
is the 32 Pdr. caliber cannonball, whose specified diameter was 6.25
inches. If
an iron ball is encountered that has a diameter equal to a ruler
fraction, like
3 and � inches (3.50) then it is not authentic.
Stamp Marks: Most
authentic Civil War cannonballs have no stamped numbers or letters on
them. Old
sports Shot Puts frequently have the numbers: 6, 8, 12 or 16 stamped on
them or
their metric weight equivalent for more modern Puts. These stamps
represent
their sports weight classification.
Peter
George says he has seen only one specimen with a low
number like “2”. Some cannonballs had a Arsenal Inspector’s mark, which
was a
single letter like “G” (Selma Arsenal) on solid shot. He says this is
extremely
rare. Thus we can probably say any number “6” or greater stamped on an
iron
ball is probably a sports Shot Put or a machinery counterweight, and
not a
solid cannonball. Multiple-stamped letters on solid balls are even
rarer and
also indicate the non-authenticity.
Step Two: Determine the Weight of the Ball
The
second step
in authentication is to use a digital scale to obtain the weight of the
solid
shot with high precision. Bathroom scales are notoriously bad at giving
correct
weight. Grocery stores also may let you weigh a small shot. CAUTION:
Be
sure to check the maximum weight capacity of any digital scale you use.
The
maximum capacity is usually written on the front of the scale.
Caveats: Often,
steel balls are sold as solid shot. Steel is denser that cast iron. For
the
same exact size of ball, a steel one will weigh
some what more than cast iron one.
Also
when comparing with the Ordnance Manual’s specified
weights for cast iron shot, remember that cast iron molding inherently
creates
bubbles inside the casting. Internal casting bubbles will make the
solid shot
lighter.
Authentic
cast iron solid shot may be lighter than the
Ordnance Manual Shot Table weight but it can never be heavier.
If a
particular shot has the correct diameter but is heavier than the weight
listed
in the Shot Tables, then it is probably steel.
The weight of a military solid shot
is never specified to
be an even
pound. If
an iron
ball is encountered with an even pound weight,
such as 3.0 or 4.0 pounds then it is not authentic and points to
civilian. The
exceptions to this rule are 8 inch and
larger caliber solid shot, but that is because the Ordnance Department
was not
concerned with specifying ounces at such great weights (65 pounds and
up).
Step Three: Match the
Measurements to the Ordnance
Manual Shot Tables
The
last step in the authentication procedure is to match a
ball’s weight and diameter with those published in the Ordnance
Manual (1862 ) Shot Tables
or in Jack
Melton and Lawrence
Pawl’s Artillery Website.
The
Manual’s tables of weight and diameter of all solid shot
(cannonballs, canister shot and grape shot) are considered to be the
accepted
value for authenticity. Compare your values of diameter and weight to
the
values found in the tables.
A Non-Authentic Example:
The
figure below shows a classic non-authentic ball actually put up for
sale at a
recent Civil War Relic Show. It appears to be about the correct size
for a 12
Pdr. caliber cannonball, but it is not of Civil War vintage nor even a
military
cannonball. The
metal of the ball is
somewhat shiny; this points to steel rather than cast iron. Excavated
cast iron
will always have rust and visible pitting while excavated steel will
have much
less rust and little or no pitting.
The
flat countersunk screw also points to non-authenticity.
This screw could cover a filler hole for a Shot Put, or it could be
covering a
point of attachment of the ball to a larger structure like a fence or
gatepost.
None of these characteristics point to an authentic piece.

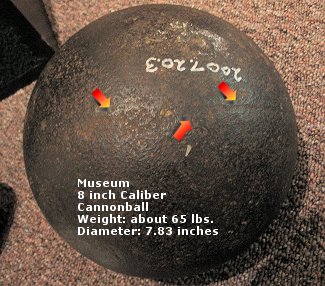
As the caliber of solid shot increases, the amount of apparent final metal finishing decreases. Shown above is an 8-inch caliber cannonball in a museum with no apparent casting sprues and a very faint mold seam as indicated by the arrows. There are no “wide” band mold seams on authentic solid shot.
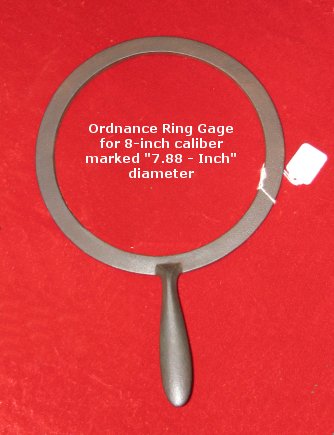
The
Ordnance Manual required that all shot
and shell be inspected both upon delivery from the manufacturer as well
as
periodically. When ordnance inspectors checked the diameter of solid
shot and
shell they used two sets of handheld metal ring-gages like the one
shown below.
The
watchwords at any public sale should be “caveat emptor”
even at Relic Shows. A few simple measurements and observations can
save the
purchaser a lot of money.
Still in Doubt? Get in Touch with
a Civil War Artillery Expert: If in doubt
about the authenticity
of any solid shot you are about to purchase, it is best to contact a
helpful
Civil War local artillery expert.
Author
Poche’s Note:
Almost
the entire above article is based upon discussions with Civil War
artillery
expert Peter George and author Poche is indebted to him for his
tireless
efforts to train the author in this subject. Without his knowledge,
this
article could not have been written.
Good
Additional
Readings:
Dean
S. Thomas, “Cannons:
An Introduction to Civil War Artillery”; 1985; (ISBN 9780939631032); 72 pp.
United
States Army Ordnance
Depot, “The Ordnance Manual for the Use of Officers of the
United States
Army”; 1862 & reprinted 2006; University of Michigan
Library
Reprint; (ISBN
9781425559717); 540 pp.
Also available through Google
Books.
Dickey,
Thomas S. &
George, Peter C., “Field Artillery Projectiles of the American
Civil War”;
1993; Arsenal Publications II; (ISBN 0960902201); 552 pp.
US
War Department, “Instruction
for Heavy Artillery”; 1851, 270 pp. Also available through Google
Books.
US
War Department, W.H.
French; W. F. Berry and H.J. Hunt “Instruction for Field
Artillery”;
1863, 281 pp. Also available through Google
Books.
John Gibbon, “The Artillerist’s Manual”; 1860; (ISBN 1402114230); 568 pp. Also available through Google Books.